My touring group has some trip plans for this year that involve travel over crevassed glaciers. In order to negotiate these obstacles safely, we hired a certified ski and rock guide to train us over three days in safe glacier travel techniques and crevasse rescue. Steep learning curve, no pun intended.
We first practised setting up crevasse victim extraction systems on easy, flat ground. The steps involve building improvised anchors, transferring the victim’s rope to the anchor (so you are no longer the only thing holding them up) and then building mechanical advantage pulling systems. All with just rope and carabiners. The anchor is built by removing and burying your skis with a short rope tied to it.
Digging this slot is difficult as I am pinned to the ground under the load of the person fallen into the crevasse. A folding aluminum shovel is part of the avalanche rescue kit we are already carrying. After filling in the snow, this new rope can now take the load and free me.
Above: The red rope is attached to my buried skis and I’ve tied the yellow rope to the downhill load rope so the victim is now supported by the anchor. This allows the people on top to get up and build something to pull the victim out. For the knot curious, from left to right is: figure eight on a bight, double overhand and out of frame is a triple prussic wrap. After anchoring the victim, the person behind me can repel down to me using a prussic wrap to their harness. Together we set up the pulley system which can look very complicated but is elegantly simple.
Above: Emil and I set up a 2:1 pulley system using rope and carabiners. The complexity arises out of building a system that can only pull in one direction and locks when we stop pulling. This protects the victim from falling if something fails or we let go of the haul rope. Complexity also arises from transferring rope loads while under pressure. This picture ought to give some indication of why these techniques are difficult to learn from books or videos!
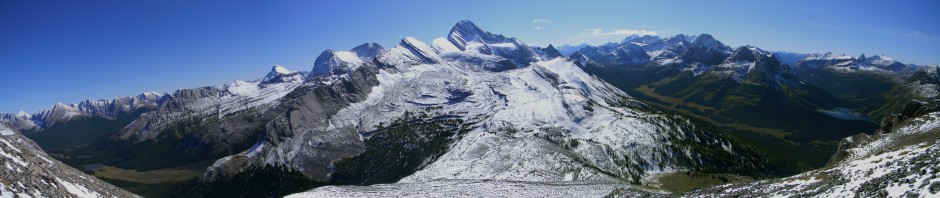
On Day 3 we skied up the Victoria Glacier to test our skills.
Above: We left from the famous Lake Louise Hotel and set out across the lake. Some tour bus denizens stopping to take their obligatory Lake Louise pictures were snapping pictures of us getting ready. We did look like we were off to do something pretty serious but we couldn’t help feeling like a herd of elk getting their picture taken!
Above: Our instructor at the toe of the glacier. Understanding how topography influences glacier morphology allows one to predict where the crevasses are more likely to be hidden under the snow. All this goes into chosing your route to minimise hazard exposure.
Above: Hugo, Peggy and Guide Doug roped up on the Victoria glacier while Doug tests the strength of the snow bridging the crevasses. The conditions were perfect for learning as it was a blizzard and near total whiteout conditions. Under conditions like this, it becomes really hard to tell if you are facing a vertical wall up or down. For testing glacier route finding, it’s ideal to experience bad conditions under supervision.
After taking turns leading on rope, we found a big cornice (the snow cliff pictured above) to simulate someone falling into a crevasse. Randy and Emil were on my rope and Emil wanted to hurl himself off this 15 foot snow cliff. Emil is indestructible but I was concerned that Randy and I could be really hurt getting yanked forward under the stress but Emil suggested that it was better to test things out for real here rather than find out when you are 5 days from help! I reluctantly agreed and it wasn’t so bad. The jerk was unpleasant, and holding him while the anchor gets built is very unpleasant as the weight pulls the harness into your kidneys something awful.
While Emil hung in the abyss, I built the anchor and transferred the rope load off of Randy and I and onto the anchor. Randy repelled to the edge and we built our rescue system and had him out in about 15 minutes. Considering we did it in a whiteout blizzard with cold hands, we were pretty pleased with our success. The instructor gave us a passing grade though we all agreed we would have to practice till we could do it in our sleep. Even under difficult conditions like these, it’s always easier than when you are under the stress of a real incident.
Above: Peggy initiating a rescue of instructor Doug who is hanging at the bottom of the rope. Flat light completely hides the abyss he is in! Here you can see how the rope under load will cut into the edge. This creates so much friction that pulling becomes impossible. This is why you need many different techniques and skills to overcome this problem. This picture also shows how slowly one must travel and the safety precautions like roping up one must practice to avoid invisible features like this.
Above: Hugo and Peggy are all smiles after successfully rescuing Doug from his snowy abyss. The blizzard lets up briefly to see the wall of giant Mt Victoria.
Above: Randy and I setting up a rescue system to pull Emil out. With the bad light it’s hard to tell that Randy (in blue) is perched on a 15 foot vertical drop. This isn’t a trick of the camera, it really can be hard to tell up from down! Randy uses a folding probe to feel his way to the edge like a blind man. The yellow cord is a sliding knot that locks in place under pressure. This allows him to safely inch his way towards the edge.
It was a great course that gave our group the skills we need to navigate through crevassed terrain. Hopefully, we will never need to perform a rescue by using good route management and techniques. But having simulated pretty accurately what it would be like, with proper techniques, it really isn’t a high consequence incident. In fact, we’ve already made plans to lower each other into some crevasses in the summer time for a picture taking trip.


Interestingly enough, you can go into some of the trendier Calgary lunch spots and order a figure eight on bight with a triple prussic wrap and not be disappointed!
HA!
Wow! I see that these were taken on the equinox. What a great way to ring in spring and QNY. I loved the photos. I was wondering if I might repost a couple of them on my blog with some edits that I did this morning. I want to discuss some camera and photo editing technique to do with the white out conditions you were shooting in.
Pingback: Mt Hector | daviditron